Altering Bind Joint Positions during the Skinning Process
This is a continuation of the tool I started at the beginning of this month to help make bind joint placement an iterative process. Setting up a bind rig from scratch is tedious, having to consider hierarchies, transformation values, rotate order, and other transformation concepts while trying to focus on best positioning for deformation. That is a problem that I tackled by creating a bidirectional skeleton template process, as described here. The next step was to make sure I could still utilize this functionality once the skinning process had begun.
Joint Orientation Patterns
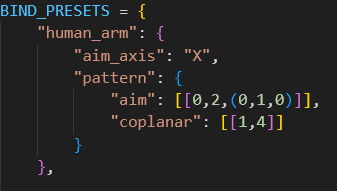
The default behavior in my tool for two locators “parented” to each other is for the parent to aim its X axis towards the child, and its Y axis in the Up world direction. This is a decent start for systems like an abstract FK chain. But in the human rig I’ve been working on, we can expect specific orientation patterns to always be needed. In the arm, we want coplanarity between the three joints used in IK. This means we need the X to aim, but also the other two axes to be pointing in the same direction. You can check this by making a literal plane between the three joints and seeing their axes are colinear to the geometry. A nifty math property is that any three arbitrary points share some orientation that would make them coplanar, so we can programmatically make this a default.
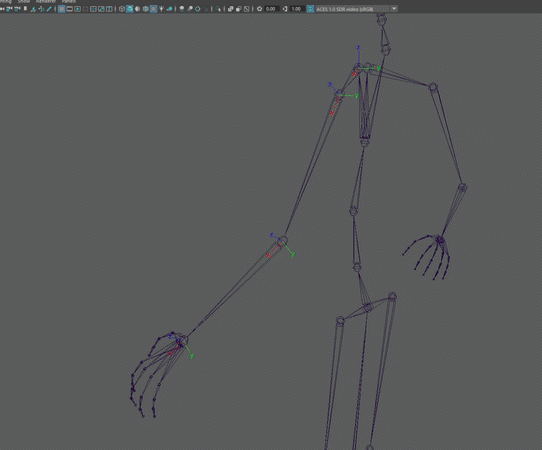
Arm joints reorient despite locator movement
My arm rig is not only those three joints, however. The clavicle is the parent of the rest of the arm, and only requires the aiming behavior, not the coplanarity. We can solve this by creating a dictionary template for an arm that specifies which joints in the rig should have which behavior. That way, for rig parts that need multiple orientations, we can still script this and fold it into the tool.
Now if I were to decide down the line that the elbow needs to be brought further in the +Z axis, when I convert the guides back to joints, the coplanar relationship is automatically recalculated.
Holding Skin Weights
All of this adjusting ability is useless if it doesn’t take in to consideration the skin weights on a mesh. After all, how will you KNOW that the elbow needs to be moved in the Z direction if not a result of limitations in the deformation weights?
When my joints are turned into guides, the joints are deleted and the locators are placed in their translation positions. This results in the deletion of the skinCluster, since there are no longer any joints to hold the weight data. This allowed me to start diving into solutions for weight transferring and holding weight data, something that I wanted to explore anyway once I start getting into character data transferring. Because this process can expect the mesh to stay the same (vertex count and order), that can be the basis of the data using openMaya’s MFnSkinCluster. A 1 to 1 vertex solution is limiting in the fact that it relies on so much of the mesh’s data to remain intact, but it also lets the rigger expect the weights to be exactly how they left them before the joints were moved. I considered something like a closest to point transfer method, but this could alter neighboring weights when a joint is translated (though it would be useful if I had a proxy mesh weight template).
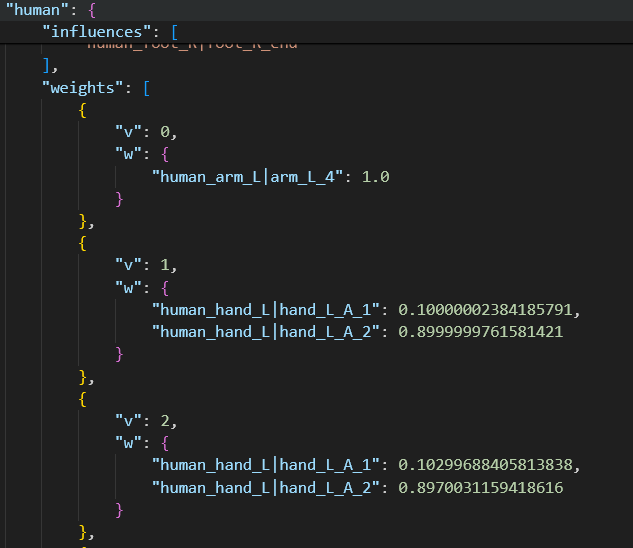
Example of held weight data per vertex
MFnSkinCluster has two fairly straight forward functions, getWeights and setWeights. These handle weight data based on what percent of a vertex is owned by a joint, returned as an array of influences. This data can be stored in a .json file, much like my other tools. Because this is my first foray into operating over components, I had some optimizing to do on my initial approach. These functions let you operate on a single vertex, or an array of vertices. When I tried the single vertex method, my 14000 point mesh took 20 seconds to copy and 50 seconds to reapply. By altering my data to do the operation once, this dropped to 1.5 seconds to copy and 1 second to apply.
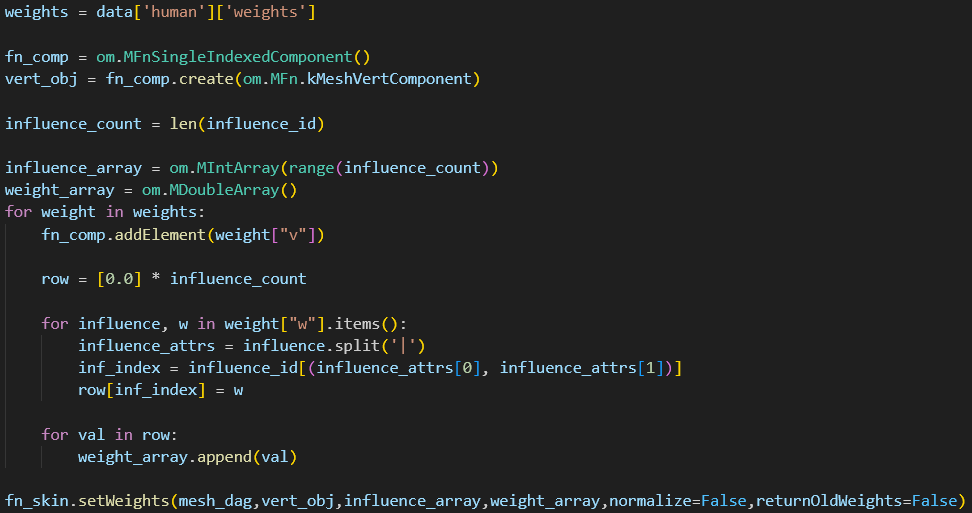
.getWeights and .setWeights can be operated on per vertex or per vertex array. This is the logic for reapplying weights
Wrap Up
With this tool’s current features, I have a decent pipeline of tools that let me quickly take a humanoid rig from base mesh to full control rig in Maya. I intend to take a break from the tooling side of things and start working on a facial rig, which will put these tools to the test and give me ideas for future scripts.